First Person Shooter Strategies
Map Reading 3
Ambush Points
spacer.gif - 67 Bytes
Map Reading Home
Map Reading 1
Overall Layout
Map Reading 2
Choke Points
Map Reading 3
Ambush Points
Map Reading 4
Routes and Spots
Map Reading 5
Holding Lines
Map Reading 6
Sniper Maps
Click here to go to First Person Shooter Strategies Home Page testphoto.jpg - 701514 Bytes

Knowing how to set an ambush is only a small part of the picture. The key to an effective ambush is where you set it. If you use a spot that is too heavily travelled, you will not be able to sustain an ambush. If it is not travelled, you get bored and lose focus. Pick a spot where you will have a moderate amount of traffic, and will be able to take cover easily, and have a wide field of view.

Once you set your ambush properly, the same people will keep coming back, trying to get you out of your spot. That's when you will be able to rack up some points, as they continue to walk into a spot where you have the strength, and they are in the open.

Here is an ambush setup that will work very well. The red dots are where claymores go, the black dot is their spawn point, and the blue dot is your position. The claymores protect the flanks, the alleyways give you a place to duck for cover, and being close to their spawn provides plenty of targets.

In a CQB map, this sort of pattern is often repeated. Look for area like this where you can protect your flanks and take cover.

clayambush.JPG - 10813 Bytes

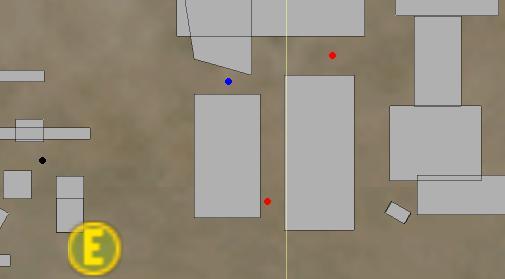
In a spot like this, you should be able to get 5 or more hits before they get you.

Start to try and predict where the next person will be coming from, and your hits will go up.

claymapambush.JPG - 75755 Bytes

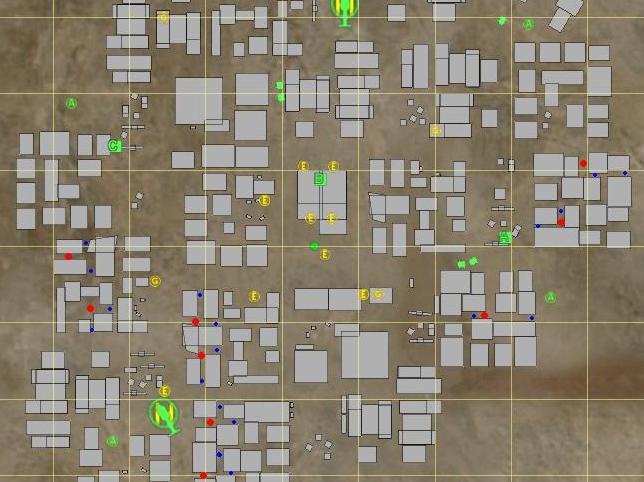
Here is the entire map, and just a small sample of the number of places you can set up an effective ambush using two clays. if there are 3-4 people setting up ambushes like this, and going to new spots each time they morph, the opponent will be unable to move quickly, because they will be looking for the next ambush.

The red dots are ambush positions, and the blue dots are where the clays go to protect the flanks. You can arrange the clays in different positions each time you use the same spot, just to keep them guessing.

Here we may display a picture of this month's special:

test photo.jpg - 701514 Bytes

Here are the most essential pages to quickly improve your gaming skills:

Keyboard and Mouse Setups

By going to these pages first, you should see quick results, and then build your gaming skills by reading the additional pages as you need to.
Let us know if these tips helped you, and what other topics will help you more.

Creating better gamers is our mission.